Showing posts with label home project. Show all posts

Tuesday, 8 December 2015

From two tender hearts grew my Home

This weekend I spent hand embroidering to create a prototype for an upcoming workshop where we play with image transfers and embroidery. 
It felt like a welcome breath of fresh air ........ and got me feeling emotional!
'From two tender hearts grew my Home'.........my gorgeous Mum and Dad on their wedding day some 45 years ago :D


It fills me with so much emotion; gratitude and love, to see these 2 youngsters and their tender hearts...without much of a clue about anything else.... who together managed to fumble along and create this deep, strong and love filled home so I was always able to know who I was and where I was from.
x 
So blessed :)

Friday, 30 January 2015

Storing your Embroidery threads

While I realise my current lurgy-fied state reduces the amount of excitement I can handle, I promise this post is better than it sounds...well....if you're an embroiderer/ tangled thread owner like me! 

This is my tidy thread stash. I use the word 'tidy' loosely...had you seen it 5 minutes prior to the photo you would have definitely questioned my grasp on english.

This is my un-tidy stash .....words not so loosely used here! Aherm.

The thing is, despite my seeming lack of disregard, I DO love my threads and the gorgeous array of colours I have gathered. I have wanted a better way of storing/displaying them, other than the card offcuts I've launched into a recycled box, for a while. Something that allows me to easily see my colour choices, something that creates a lovely display in my studio, but something that is also portable.
Having little energy to do much else (back to being lurgy-fied!) I have been perusing the wild web, curious to see how other stitchers are keeping their embroidery threads stored and tidy!

And so here is what I found...
These very cute little cats were created by Gloria over on The Little White Whale - very simple to make and so many variations come to mind. Though I'm essentially still back to cardboard (though nicely shaped!) being launched into a box.

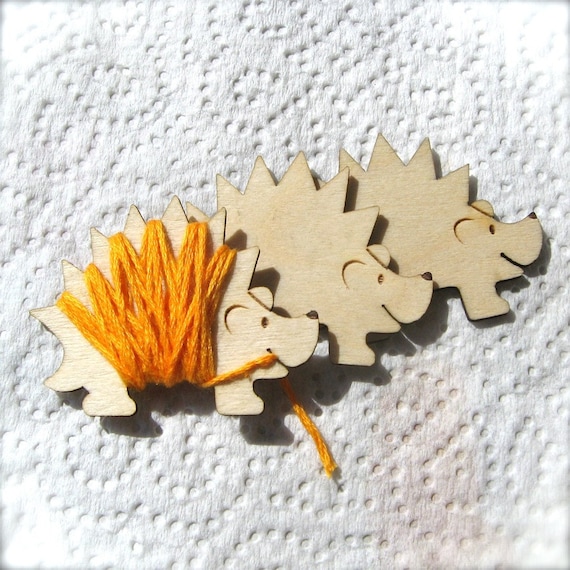
I found these lovely birch plywood bunnies and hedgehogs in this etsy shop;
Bunnies available here

Isn't the hedgehog a clever design? However at approx £10 for 3, a small mortgage would be required if I wanted to "house" every different coloured thread I have.
Hedgehogs available here

I like the idea of Jessica's over on Sew Homegrown, who created this simple and very lovely way to store her ribbons, using corrugated cardboard and reclaimed wood . This would easily work with embroidery thread, be inexpensive and I could easily pick out the colours I wanted to use and carry them around. Jessica created a tutorial,if you are interested you can find it here.

This made me smile when I came upon the ingenuity.........
Spruced up bread clips to hold your thread! Do you still get these clips? 
Loving the genius of  Amizuki ...though not sure I could eat the amount of bread required for my thread collection....may take a while.

The last option I found, I'll tell you now is probably the one I'm going to go for.....It's the wooden peg option!

Heather shared this on her blog Mrs Jones, and the above photo immediately had be enticed. Add the fact that the pegs are all ready for immediate use , and I am pretty much convinced.
No cutting, hole piercing, bread eating, mortgage taking. Sweet!
 As an extra thought, I also love that the ends of the thread can get pinched by the peg AND that I can string the colours on twine along my studio wall =  easy access , lovely display & portable threads.
Yep I'm 100% sold. Now to get the pegs and start a winding. I promise to update once done.

What about you? How do you store your threads. Do you have a better solution?I'd love to hear x


Tuesday, 20 January 2015

A weekend of weaving

I mentioned before that I had put a weaving loom on my Xmas list (having been inspired by all the gorgeous woven wall hangings that are out there). Lo and behold I had been a good girl and got one....a mahoosive one at that! 
I also mentioned that I'd planned to use the holidays as a chance to get weaving with the tutorial created by "A beautiful Mess " as my starting point. Yes I have done weaving before, but it was several decades ago on a piece of small cardboard  with zigzag ends.... I know you know what I'm talking about :)

Of course the weaving never got a look in over Christmas, but this weekend brought the opportunity as the girls, Stu and I seemed geared for a quiet one. (Usually the case is small child needs"exercised" and I have cabin fever) So the weaving weekend began.......


It's much like embroidery...a slow, repetitive process, very relaxing and allows the mind to unwind. And just like embroidery I end up jumping about, working on different bits so I get a change in wool/thread colours. (and undoing bits I'm not happy with!)

Come saturday evening I'd gotten this far (above).... tis a slow process for sure, but beginning to take shape...and I've got some tassles on the go so I'm happy!


Sunday morning brought a surprise wee sprinkling of snow. Couple this with sunshine and I felt inspired to enjoy a little weaving on the windowsill. Felt somewhat "historic", as the town I grew up in (and currently live) was once known as a textile centre with over 1500 hand loom weavers around the 1860's. I actually grew up in a an old weavers home, with small low windows where the looms would be positioned under....... 


Yeah well.......don't think they'd be using neon pink wools.....and while  my loom might be big it's no way nearly as big as theirs :)

This is where is where I finished before a venture out into the world called (and a cup of tea and cupcake! ) I'm getting there, just need another weekend of weaving...... xx

Wednesday, 5 November 2014

A new take on a sketchbook....

Its taken me a long time to get into sketchbooks, but over the last year or two I've really enjoyed letting loose amongst the pages. The phrase "letting loose" has been key to my enjoyment, as for so long sketchbooks have intimidated me with their blank pages full of expectations! 
Now they are simply a place to splurge, explore and play around without much focus or direction at all.
As you can see from the little snippets below,my sketch books pages are full of  mess and colour, as well as different mediums - paint, pencil, pens, paper and fabric amongst them....
Lots of ideas and projects have sprung from the quick sketches and splurges of creativity, but the best bit for me is the pure and simple happiness that comes from creating without agenda. 

You see I find myself often falling into the trap that has come with being a self employed artist... you know, the one where you seldom find yourself creating for creativity's sake, but rather with an end product in mind. Somehow the hobby (and love) gets replaced by a full time FULL TIME job, where there is never any down time (and not much room for love either!) 

I noticed myself falling into that little trap again recently, so decided to pull out the old sketch book again..but this time with a twist!
Evenings (especially in winter) are a time when I love to curl up on the couch with a little sewing project on the go. So my thinking was to create a sketchbook where I could stitch and doodle, add mixed media, splodge paint and draw with pencil as the notion  took. A sketchbook I could perch on my knee with the required bits and bobs on hand and work on in the evening "down time".
You can see what I came up with below.......

I got a long strip of fabric and divided it up into squares for "pages". This will turn into a book when I'm done, but for now is like a very long scarf! (see! exactly what a winter evening requires!) I began by dabbing, stamping and sticking a few bits of paper and paint onto the fabric with no specific plan in mind,  then the little step by step ideas /experiments/explorations begin. Turns out I'm doing a brown/blue and pink colour theme....it may change! 


These are a couple of close-up  "sketch book" pages, where things are in the beginning stages....
I'm look forward to coming back and sharing what this little winter evening project of "letting loose" will bring!


What are your plans for the upcoming wintery evenings? Have you got a little something planned to bury yourself and keep (creatively) cosy in? Hope so :) xx

Wednesday, 29 October 2014

Embroidery for children - gentle ways to encourage them

My mum has always sewn and crafted as well as both my grandmothers, but I actually learned how to embroider at primary school. I was 9 and can remember it well.... our teacher Mrs Frew, presented the whole class with some bits of denim to transform into a peg bag. It seemed an impossible task but in actual fact was entirely do-able.... and most enjoyable! I was completely smitten and been in love ever since (spurred on by the fact I won that years sewing prize, which admittedly went straight to my head!) 
My mum still uses that peg bag some 30+ years later! Looking a bit worse for wear ;)

It would be fair to say that I'm keen to nurture any interest in sewing with my 2 girls, and Skye (who is now 6) has shown an interest in sewing and embroidering for a few years now. 
I came up with a couple of ways that suited her skills and interest, which I thought I'd share, just in case you know a little person that would like to try!
Granted there are a lot of sewing kits available to buy for children, but  there doesn't seem to be much for the pre-schooler , plus I am always keen to use items I already have at home, and like the idea of  personalising which the kits don't necessarily allow for.

Skye did this when she was 4! Makes me smile :D
This is made from a craft foam sheet where I drew a very simple shape (as requested by Skye) and then punched out holes,using a hole punch around the outline.(I had planned to cut out the butterfly shape, but Skye liked the rectangular shape)  It's much like the old lacing cards I remember playing with as a child.... and simply requires the weaving in and out of the thread, and adding on some big beads if they fancy! 

I had previously bought  some yarn needles which are big, blunt, plastic needles that can easily be threaded with a colourful wool. These captured the essence of a "real" needle which seemed the most important element to Skye at the time.....she wanted to do "real" sewing!  The craft foam added to that by coming in a variety of colours to choose from, and being flexible enough to allow movement and being comfortable to hold.


I also took the craft foam, hole punch,needles and wool up to Skye's pre-school nursery where all the girls and boys seemed quite enamoured with the idea. Shapes varied from hearts and rockets, to rabbits and kites :)

Fast forward a year and a bit later, Skye wanted to do some sewing where she was using an embroidery hoop and "proper" thread!
I still reckoned the yarn needle would be the best/safest option so looked out some fabric with a loose enough weave that would allow for a thick needle. Linen seemed like the best option out of what I had.
Using the water soluble pen I have to transfer embroidery designs, Skye then drew her picture onto the fabric.
Skye wanted to go over the lines of her drawing with a line of stitch and the easiest way I found was to show her Running stitch. She would go up one line doing running stitch until she reached the end of the line, then she'd turn the fabric around and go back down the line sewing running stitch in between the gaps she'd just created. She got it pretty quickly and was happy with the effect, which I reckoned was far more important than teaching a "proper" backstitch.
She used embroidery floss which was doubled with a MASSIVE knot on the end! I think I've mentioned it before but I am ALL for a good granny knot....though my Granny would be most disgusted! :)

I love seeing that little face in deep concentration...and the proud smile that came with the realisation that she too could embroider!


I would love to end this with the finished embroidery to show you...but as with most kids, the attention span ended shortly after these photos! And the desire to go back and finish the little picture has not returned either.
I'm curious to see where our little sewing adventure takes Skye and I next :)x